In welding, how you join metal is very important. If the joint is not right, the weld can break, even if your welding looks good.
According to the American Welding Society (AWS), a joint is simply “the way materials fit together.” In real life, this just means how you place two metal pieces before welding them.
There are many types of welding jobs, and each job needs a different kind of joint. You can’t use the same joint for everything.
In this post, I will explain the main types of welding joints in very simple words, so you can understand which one to use and when.
If you are new and don’t fully understand welding yet, you can first learn the basics in my guide on What is welding, types, tools and safety tips.
What is a Welding Joint?
A welding joint is the way two or more metal pieces are placed together before you weld them.
In very simple words, it’s just how you set the metal before you start welding.
For example, you can place two plates side by side, on top of each other, or at an angle. Each way is a different joint.
Why Welding Joints Are Important
Many beginners think welding is only about the machine and technique. But in real work, the joint matters just as much.
If the joint is wrong, even a good weld can fail.
From my own work, I’ve seen this happen. Once I welded two plates quickly without thinking about the joint. The weld looked fine from outside, but after some time, it cracked. The problem was not my welding — it was the joint.
Here’s why joints are important:
- They decide how strong your weld will be
- They affect how long your work will last
- They change how easy or hard the welding process is
- They also affect how clean or rough your final work looks
How Joint Type Affects Welding
1. Strength
Different joints give different strength.
Some joints hold more metal together, so they are stronger. Others have less support, so they are weaker.
- Lap joints and T-joints are usually strong because they have more contact area
- Butt joints can also be very strong, but only if done properly
- Edge joints are weaker and mostly used for light work
If you are working on something heavy or load-bearing, choosing the right joint is very important.
2. Appearance
The joint also changes how your weld looks.
Some joints give a clean and smooth finish, while others may look thicker or more visible.
- Butt joints usually give a neat and straight look
- Corner joints are good when you are making boxes or frames
- Some joints can look bulky if not done carefully
If your work is for show (like gates, frames, or furniture), then appearance matters a lot.
3. Welding Difficulty
Not all joints are easy to weld.
Some are simple and good for beginners, while others need more skill and control.
- Butt joints are easier to start with
- Lap joints are also beginner-friendly
- T-joints and corner joints need better hand control and angle
- Some positions can be hard, especially if welding vertically or overhead
From my experience, choosing the right joint can make your work much easier. If the joint is simple, your welding becomes smooth and less stressful.
Main Types of Welding Joints
1- Butt Joint
A butt joint is when two metal pieces are placed side by side in the same line.
Both pieces touch each other at the edges, and you weld along that line.
In simple words, it’s like joining two flat pieces to make one long piece.
How It Looks
It looks straight and flat. You can see in the below image how it looks

The weld is done in the middle where both edges meet.
Where It Is Used
Butt joints are used in many common jobs, such as:
- Joining metal plates
- Pipe welding
- Structural work
- Repair work
I use this joint a lot when I need a clean and straight connection.
Pros and Cons of Butt Joint
- Gives a clean and smooth finish
- Good for making flat surfaces
- Uses less material compared to other joints
- Can be very strong if welded properly
- Needs proper alignment (very important)
- If there is a gap, the weld can become weak
- For thick metal, edge preparation is needed
- Not very forgiving for beginners
2- Lap Joint
A lap joint is when one metal piece is placed on top of another metal piece, and then both are welded together.
In simple words, you “overlap” the metals and weld along the edges.
Structure / Position
In this joint, the two pieces are not in the same line. One piece sits over the other as you can see in the below image:
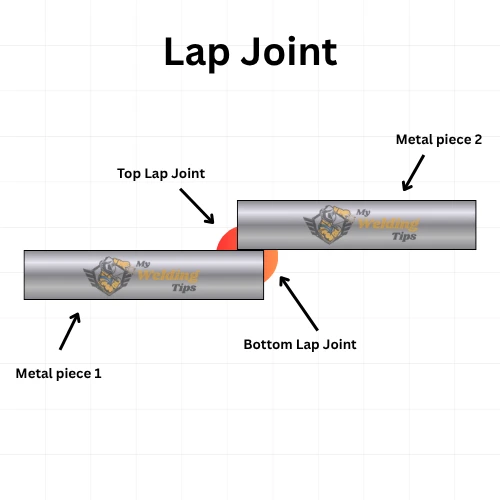
The weld is usually done along one or both edges where the two metals touch.
Because the metals overlap, this joint has more contact area compared to some other joints.
If you are using MIG welding for these joints, choosing the right gas is important. You can read my full guide on what gas is used for MIG welding.
Common Uses
Lap joints are used in many everyday welding jobs, especially when working with thin metal.
Some common uses are:
- Sheet metal work
- Car body repairs
- Roofing and metal covers
- Light structural work
I often use lap joints when working with thin plates because they are easier to handle.
Pros and Cons of Lap Joint
- Strong joint because of more overlapping area
- Easy to make, good for beginners
- No need for perfect edge alignment
- Works well with thin metals
- Less chance of burn-through compared to butt joints
- Can trap moisture between the layers (can cause rust)
- Not always good for thick metals
- Uses more material due to overlap
- Weld may not look very clean from all sides
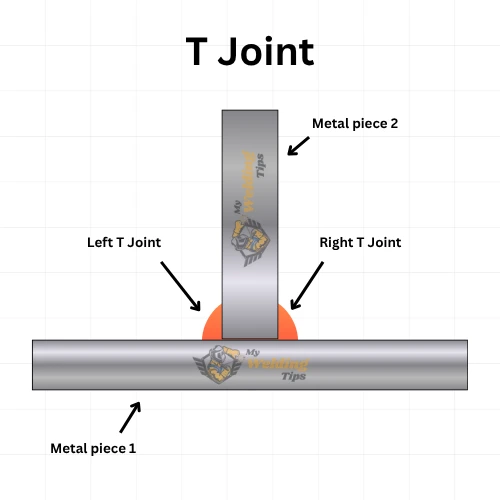
3- T-Joint
A T-joint is when one metal piece is placed upright on another flat piece, making a shape like the letter “T”.
One piece stands straight, and the other stays flat. Then you weld where they meet.
Position of a T-Joint (How It Looks)
A T-joint looks exactly like the letter “T”.
One metal piece lies flat (this is the base), and the other piece stands straight on top of it at a 90-degree angle. See the below image to understand better:
Where It Is Used
T-joints are very common in welding work, especially in:
- Metal frames
- Gates and grills
- Structural work
- Machine parts
I use this joint a lot when building frames because it gives good support.
Weld Type Used (Fillet Weld)
In a T-joint, we mostly use a fillet weld.
A fillet weld is a weld that fills the corner between two metal pieces.
In simple words, it looks like a triangle shape that joins both pieces together from the inside corner.
It is strong and easy to apply, which is why it is commonly used in T-joints.
Pros and Cons of T-Joint
- Strong joint when done correctly
- Good for supporting vertical and horizontal pieces
- No need for edge preparation in most cases
- Widely used in many projects
- Can be tricky for beginners to get the angle right
- Risk of weak weld if heat is not controlled properly
- May need welding on both sides for extra strength
- Can have distortion if not welded carefully
Personal Tip
From my experience, the most important thing in a T-joint is your welding angle.
If your angle is wrong, the weld will sit more on one side and make the joint weak.
I always try to keep my hand steady and angle balanced so the weld spreads evenly on both pieces.
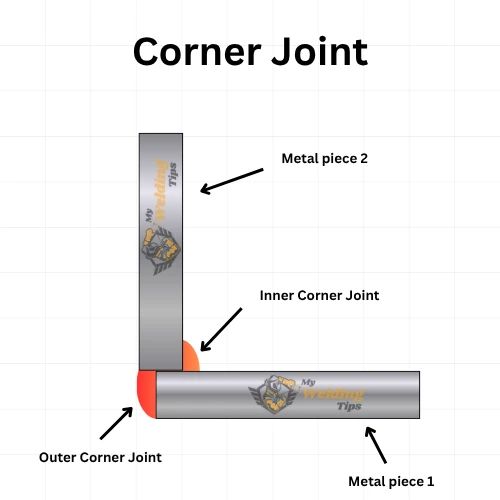
4- Corner Joint
A corner joint is when two metal pieces meet at a corner, forming an “L” shape.
Both pieces are joined at their edges, not flat like a butt joint and not overlapping like a lap joint.
In simple words, you are joining two pieces to make a corner.
Structure of a Corner Joint
The structure of a corner joint is very simple.
Two metal pieces are joined at their edges to form a 90-degree angle, making an “L” shape.
How the Pieces Are Placed
- Both metal pieces meet at the ends (edges)
- One piece is horizontal, and the other is vertical
- They form a corner, not flat and not overlapping
After looking at the image below, you will understand the structure much more easily.
It clearly shows how two metal pieces are joined at a 90-degree angle to form a corner. You can see how the edges meet and where the weld is applied.
Types of Corner Joints
There are two simple types:

1. Open Corner Joint
In this type, there is a small gap between the two metal pieces.
- Easy to weld
- Good for thicker welds
- You can fill the gap with weld metal
2. Closed Corner Joint
In this type, both metal pieces are tightly placed together with no gap.
- Looks cleaner from outside
- Needs more precision
- Less space to add weld metal
3. Half Corner Joint
A half corner joint is a type of corner joint where one metal piece is slightly cut or prepared, and the other piece fits into it at the corner.
In simple words, instead of just touching edges, one piece “sits into” the other a little bit. This makes the joint stronger than a normal corner joint.
Where It Is Use
Corner joints are commonly used in:
- Making boxes
- Metal frames
- Cabinets
- Tanks and containers
I use this joint a lot when making square shapes or box-type structures.
Pros and Cos of Corner Joint
- Good for making shapes like boxes and frames
- Can give a clean and neat finish
- Works with both thin and thick metals
- Flexible (can be welded from inside or outside)
- Can be weak if not welded properly
- Needs proper alignment for a clean corner
- Closed corner joints are harder for beginners
- Risk of burn-through in thin metal
5- Edge Joint
An edge joint is when two metal pieces are placed side by side, and their edges are welded together.
In simple words, both pieces are next to each other, and you weld along the edge.
When It Is Used
Edge joints are mostly used for light work, especially with thin metal.
Common uses include:
- Sheet metal work
- Covers and panels
- Low-strength structures
- Sealing edges
I usually use this joint when strength is not the main concern.
Position of an Edge Joint (How It Looks)
In an edge joint, both metal pieces are placed side by side, with their edges touching each other.
Unlike a lap joint, nothing is on top. Unlike a butt joint, the focus is only on the edges, not the full thickness.
You can see in the below image how it looks:

How the Weld Is Applied
- The weld is done along the shared edge
- Sometimes welding is done on one side only
- In some cases, both edges are welded for better hold
Pros and Cons of Edge Joint
- Very simple and quick to make
- Good for thin metal sheets
- Needs less welding effort
- Clean and straight finish
- Not very strong compared to other joints
- Not suitable for heavy or load-bearing work
- Can easily bend or break under pressure
- Needs proper alignment of edges
Personal Tip
From my experience, edge joints look easy, but they need care.
If the edges are not straight or clean, the weld will not hold properly.
I always make sure the edges are aligned and cleaned before welding. It helps get a better and cleaner result.
Types of Welds Used in These Joints
When we talk about welding joints, we also need to understand the type of weld used to join them.
In most basic work, you will mainly use two types:
- Fillet weld
- Groove weld
Let me explain both in a very simple way.
Fillet Weld
A fillet weld is used when two metal pieces meet at an angle, like in a corner or “T” shape.
In simple words, it fills the gap between two pieces and holds them together.
It usually looks like a small triangle shape between the metals.
Where It Is Used
Fillet weld is the most common weld I use in daily work.
It is used in:
- T-joints
- Lap joints
- Corner joints
Anytime metals meet at an angle, fillet weld is usually the best choice.
- Easy to learn for beginners
- No need to cut or prepare edges
- Strong enough for most jobs
- Saves time
Groove Weld
A groove weld is used when two metal pieces are placed in the same line, like in a butt joint.
Before welding, a small groove (gap or cut) is made between the pieces. Then the weld fills that space.
In simple words, you make space first, then fill it with weld.
Where It Is Used
Groove weld is mostly used in:
- Butt joints
- Thick metal welding
- Pipe welding
- Heavy structural work
Why It Is Used
- Gives very strong welds
- Good for thick materials
- Deep penetration (weld goes inside properly)
Difference Between Fillet Weld and Groove Weld
| Feature | Fillet Weld | Groove Weld |
|---|---|---|
| Simple Meaning | Fills the corner between two metals | Fills a gap between two aligned metals |
| Shape | Triangle shape | Straight line (inside a groove) |
| Joint Type | T-joint, Lap joint, Corner joint | Butt joint |
| Edge Preparation | Not needed | Needed (cutting or grinding groove) |
| Difficulty Level | Easy (good for beginners) | Medium to hard |
| Strength | Strong for most normal work | Very strong (best for heavy work) |
| Use with Metal | Thin to medium thickness | Medium to thick metal |
| Time Required | Less time | More time (due to preparation) |
| Appearance | Slightly raised weld | Can be smooth and flat |
How to Choose the Right Welding Joint
Choosing the right welding joint is very important. It can make your work strong, clean, and easy — or weak and difficult if you choose wrong. From my experience, before I start any welding, I always think about a few simple things.
- Metal Thickness
First, check how thick your metal is. If the metal is thin, joints like lap joint or edge joint work better because they are easier to handle. For thick metal, butt joints with groove welds are a better choice because they give deeper strength.
- Strength Needed
Think about how strong your weld needs to be. If you are making something heavy like a frame or support, go for strong joints like T-joint or lap joint. For light work like covers or panels, edge joints can be enough.
- Position of the Metal
Look at how the metal pieces are placed. If both pieces are in a straight line, a butt joint is good. If one is on top of another, use a lap joint. If one piece is standing, then a T-joint is the right option.
- Type of Work
Different jobs need different joints. For example, making a box or frame needs corner joints, while pipe or flat plate work usually uses butt joints. Always match the joint with the job you are doing.
- Ease of Welding
Be honest about your skill level. If you are a beginner, choose simple joints like butt or lap joints. Some joints need more control and can be hard if you are just starting.
7 Common Mistakes Beginners Make
When you are new to welding, mistakes are normal. I also made many in the beginning. But the good thing is — if you know these mistakes early, you can avoid them and improve faster.
Welding can be dangerous if safety is ignored. You can also check basic safety guidelines from Occupational Safety and Health Administration.
- Choosing the Wrong Joint Many beginners don’t think about the joint and just start welding. Not every joint works for every job. If you pick the wrong one, your weld may look okay but won’t be strong. Always match the joint with the type of work.
- Poor Alignment of Metal This is one of the most common problems. If the metal pieces are not straight or not properly fixed, the weld becomes weak. Even a small gap or uneven setup can cause issues later.
- Not Cleaning the Metal Dirt, oil, rust — all these things can ruin your weld. Many beginners skip cleaning, but this step is very important. A dirty surface can cause weak welds and defects.
- Wrong Welding Angle: Angle matters a lot, especially in T-joints and corner joints. If your angle is wrong, the weld will not spread evenly and can become weak on one side.
- Too Much or Too Little Heat
Heat control is very important.- Too much heat can burn through the metal
- Too little heat can make a weak weld
- Welding Too Fast or Too Slow Speed also affects your weld. If you go too fast, the weld will not penetrate properly. If you go too slow, it can become too thick or messy.
- Ignoring Safety: Some beginners don’t take safety seriously. Not using gloves, helmet, or proper clothing can be dangerous. Always protect yourself while welding.
Welding can be dangerous if safety is ignored. Some jobs like underwater welding are even riskier. Read about it in top risks of underwater welding.
FAQs About Types of Welding Joints
What are the main types of welding joints?
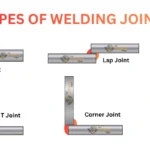
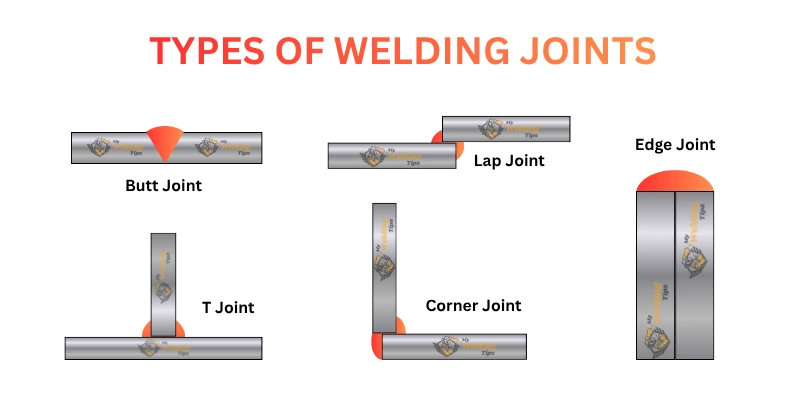
The main types of welding joints are butt joint, lap joint, T-joint, corner joint, and edge joint. These are the most common joints used in welding, and each one is used for a different purpose depending on the job.
Which welding joint is the strongest?
In most cases, lap joints and T-joints are very strong because they have more contact area between the metal pieces. A butt joint can also be very strong if it is done properly with a groove weld.
Which welding joint is best for beginners?
For beginners, butt joints and lap joints are the easiest to start with. They are simple to set up and don’t need too much skill compared to joints like T-joints or corner joints.
What is the difference between a butt joint and a lap joint?
A butt joint joins two metal pieces in a straight line, edge to edge. A lap joint overlaps one piece on top of another. Lap joints are usually stronger, while butt joints give a cleaner look.
What type of weld is used in T-joints?
In T-joints, the most common weld used is a fillet weld. It fills the corner between the vertical and flat metal pieces and holds them together strongly.
When should I use a groove weld?
You should use a groove weld when working with butt joints, especially with thick metal. It helps the weld go deeper and makes the joint stronger.
What is a corner joint used for?
A corner joint is used when making shapes like boxes, frames, tanks, and metal structures. It joins two metal pieces at a 90-degree angle to form a corner.
Is an edge joint strong?
An edge joint is not very strong compared to other joints. It is mostly used for thin metal sheets, panels, and light work, where high strength is not needed.
What is the difference between fillet weld and groove weld?
A fillet weld is used in joints like lap joints, T-joints, and corner joints, and it fills the corner between metals. A groove weld is used in butt joints, where a gap is created and then filled with weld for deeper strength.
How do I choose the right welding joint?
To choose the right welding joint, think about:
– Metal thickness
– Strength needed
– Position of metal (butt, lap, T, corner, edge)
– Type of weld (fillet weld or groove weld)
From my experience, choosing the right joint makes welding easier and gives better results.
Final Thoughts
Welding joints may look simple, but they are the base of strong and clean welding work.
If you understand the different types like butt joint, lap joint, T-joint, corner joint, and edge joint, you will already be ahead of many beginners. Each joint has its own use, and choosing the right one makes your work easier and better.
From my experience, most problems in welding don’t come from the machine — they come from choosing the wrong joint or poor setup. If your joint is correct, half of your work is already done.
So take your time before welding. Set your metal properly, choose the right joint, and then start.
Also, Many people also ask about welding careers and income. You can check my guide on how much underwater welders make.
Keep practicing, and with time, you will not even have to think — you will just know which joint to use
Hello Everyone! I’m Seo Jun, a professional welder with over 7 years of hands on practical experience in South Korea. Right Now, working in Seakor Corp. Ltd. I created myweldingtips.com to share real-life welding tips, safety advice, and techniques. My goal is to help others learn faster and work smarter through practical, easy-to-understand welding guides. Email